Can You Paint A Kitchen Island? A Comprehensive Guide
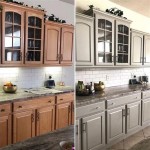
The kitchen island stands as a central hub in many modern homes, serving as a food preparation surface, a dining area, and a social gathering point. Over time, the finish on a kitchen island can become worn, outdated, or simply no longer align with evolving design aesthetics. Painting a kitchen island presents a cost-effective and relatively simple method for revitalizing the space and updating the overall look of the kitchen. However, success depends on proper preparation, appropriate material selection, and careful execution. This article provides a detailed guide on the process of painting a kitchen island, outlining the essential steps to achieve a professional-looking result.
Preparation is Paramount: Cleaning, Sanding, and Priming
The foundation of any successful painting project lies in thorough preparation. The initial step involves meticulously cleaning the kitchen island to remove any grease, grime, food splatters, or other contaminants that could impede paint adhesion. A degreasing cleaner, specifically formulated for kitchen surfaces, is recommended for this purpose. Apply the cleaner according to the manufacturer's instructions, ensuring that all surfaces are thoroughly wiped down. Once cleaned, allow the island to dry completely.
Next, consider the existing finish. If the island has a glossy surface, sanding is crucial to create a "key" for the new paint to grip onto. Use medium-grit sandpaper (around 120-grit) to lightly scuff the existing finish. The goal is not to remove the existing finish entirely, but rather to create a slightly abraded surface. For surfaces with a more matte or textured finish, less aggressive sanding may be required, or even skipped entirely depending on the existing surface profile. If there are any imperfections, such as dents or scratches, wood filler can be used to repair them. After the filler has dried completely, sand it smooth to blend seamlessly with the surrounding surface.
Once sanding is complete, thoroughly remove all sanding dust. A vacuum cleaner with a brush attachment is effective for this purpose, followed by wiping down the entire surface with a tack cloth. The tack cloth will pick up any remaining fine dust particles, ensuring a clean surface for priming.
Priming is an essential step, particularly when painting over dark colors or different materials. Primer creates a uniform surface, improves paint adhesion, and helps to prevent stains from bleeding through the topcoat. Choose a high-quality primer specifically designed for the type of surface you are painting (e.g., wood, laminate, or metal). Apply the primer in thin, even coats using a brush, roller, or sprayer, following the manufacturer's instructions regarding drying time between coats. Depending on the existing surface and the primer used, one or two coats may be necessary. After the primer has fully dried, lightly sand it with fine-grit sandpaper (around 220-grit) to create an even smoother surface for painting. Again, thoroughly remove all sanding dust before proceeding.
Selecting the Right Materials: Paint, Tools, and Protective Gear
Choosing the right paint is critical for achieving a durable and aesthetically pleasing finish. For kitchen islands, consider using a high-quality paint designed for kitchen cabinets or furniture. These paints are typically formulated to be resistant to moisture, grease, and stains, and they offer a hard, durable finish that can withstand frequent cleaning. Options to consider include acrylic latex paints, alkyd paints, and specialty cabinet paints.
Acrylic latex paints are water-based and offer several advantages, including low VOCs (volatile organic compounds), easy cleanup, and good color retention. Alkyd paints, also known as oil-based paints, provide a harder, more durable finish than acrylic latex paints, but they have higher VOCs and require mineral spirits for cleanup. Specialty cabinet paints are specifically designed for kitchen cabinets and furniture, offering excellent adhesion, durability, and a smooth, even finish. These paints often incorporate self-leveling properties, which help to minimize brush strokes and roller marks.
The sheen of the paint is another important consideration. Semi-gloss and gloss paints are more durable and easier to clean than matte or satin paints, making them well-suited for kitchen environments. However, higher sheens can also highlight imperfections in the surface, so proper preparation is essential. A satin or eggshell finish may be considered if a less reflective surface is desired, but increased cleaning frequency might then be required.
In addition to paint, the following tools and materials are essential for painting a kitchen island: paintbrushes (angled brushes are useful for cutting in edges), paint rollers (foam rollers are best for achieving a smooth finish), paint trays, painter's tape, drop cloths, sandpaper, wood filler (if needed), a sanding block or orbital sander, tack cloths, and a degreasing cleaner. Personal protective equipment, such as safety glasses, gloves, and a respirator, should also be worn to protect against paint fumes and dust.
When selecting painting tools, invest in high-quality brushes and rollers. Inexpensive brushes can shed bristles, leaving imperfections in the paint finish. High-quality brushes hold more paint, allowing for smoother and more even application. Similarly, high-density foam rollers provide a smoother finish than cheaper, less dense rollers.
The Painting Process: Applying the Paint, Achieving a Smooth Finish, and Allowing for Proper Drying
Before beginning the painting process, protect the surrounding area with drop cloths to prevent paint splatters. Use painter's tape to mask off any areas that you do not want to paint, such as countertops, floors, or adjacent cabinets. Ensure the tape is firmly adhered to the surface to prevent paint from bleeding underneath.
Start by cutting in the edges and corners with a brush. Cutting in involves painting a narrow strip along the edges and corners of the island, creating a clean, defined line. Use an angled brush for this purpose, applying the paint in smooth, even strokes. Avoid applying too much paint at once, as this can lead to drips and runs.
Once the edges have been cut in, use a roller to paint the remaining surfaces. Load the roller with paint, but avoid over-saturating it. Apply the paint in thin, even coats, overlapping each stroke slightly to ensure complete coverage. Roll in the direction of the wood grain (if applicable) for a more uniform appearance. Be mindful of drips and runs, and immediately wipe them up with a clean brush or cloth. Two thin coats are generally preferable to one thick coat, as they provide better coverage and reduce the risk of drips and runs.
If using a sprayer, follow the manufacturer's instructions carefully. Proper sprayer settings and technique are essential for achieving a smooth, even finish. Test the sprayer on a piece of cardboard or scrap wood before painting the island to ensure that the paint is being applied correctly.
Allow each coat of paint to dry completely before applying the next coat. Drying times will vary depending on the type of paint, humidity, and temperature. Refer to the manufacturer's instructions for specific drying times. After each coat has dried, lightly sand the surface with fine-grit sandpaper (around 320-grit) to remove any imperfections and create a smoother surface for the next coat. Thoroughly remove all sanding dust before proceeding.
Once the final coat of paint has dried completely, carefully remove the painter's tape. Pull the tape away from the painted surface at a 45-degree angle to prevent chipping the paint. Inspect the painted surface for any imperfections, such as drips, runs, or missed spots. Touch up any imperfections with a small brush. Allow the paint to fully cure before using the kitchen island. Curing times can vary depending on the type of paint, but generally, it takes several days to a week for the paint to reach its maximum hardness and durability. Avoid placing heavy objects on the painted surface during the curing process.
Proper ventilation is crucial when painting, especially with oil-based paints. Open windows and doors to provide fresh air. Use a fan to circulate air and remove paint fumes. When cleaning brushes and rollers, follow the manufacturer's instructions for the type of paint used. Water-based paints can be cleaned with soap and water, while oil-based paints require mineral spirits or paint thinner.
By following these detailed steps, one can successfully paint a kitchen island, transforming its appearance and enhancing the overall aesthetic of the kitchen. While seemingly straightforward, patience and attention to detail are vital for achieving a professional and long-lasting finish.

How To Paint A Kitchen Island Thistlewood Farm

How To Paint A Kitchen Island Sherwin Williams

How To Paint A Kitchen Island At Home With Ashley

How To Paint A Kitchen Island At Home With Ashley

Painting A Kitchen Island With Paint Sprayer Wagner Spraytech

Customize Your Kitchen With A Painted Island

Paint Your Kitchen Island Matt The Painter

How To Paint A Kitchen Island At Home With Ashley

How To Paint A Kitchen Island Thistlewood Farm

Colorful Ideas To Paint Your Kitchen Island In East Greenwich Two Brothers Painting
Related Posts